zhangdd谈ceph(二)centos7.4 安装ceph10.2. Jewel环境规划及基础配置
centos7.4 安装ceph10.2. Jewel环境规划及基础配置
more /etc/redhat-release

CentOS Linux release 7.4.1708 (Core)
uname –a

Linux node1 3.10.0-693.21.1.el7.x86_64 #1 SMP Wed Mar 7 19:03:37 UTC 2018 x86_64 x86_64 x86_64 GNU/Linuxx86_64 x86_64 GNU/Linux
ceph -v
ceph version 10.2.10 (b1e0532418e4631af01acdd426f1905f4af)

ceph-deploy版本:
[root@node1 cephfs]# ceph-deploy --version
1.5.37
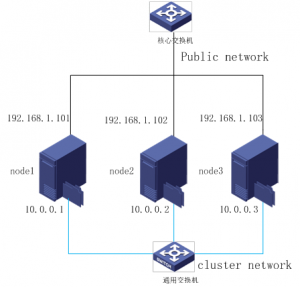
| 节点 | 配置 | 用途 | 网络配置 | 备注 |
| node1 | E5-2620 16G 600g*2
ssd 256g *4 4T*8 |
Mon1 mds1
osd 0-7 |
192.168.1.101
10.0.0.1 |
|
| node2 | E5-2620 16G 600g*2
ssd 256g *4 4T*8 |
Mon2 mds2
osd 8-15 |
192.168.1.102
10.0.0.2 |
|
| node3 | E5-2620 16G 600g*2
ssd 256g *4 4T*8 |
Mon3 mds3
osd 16-23 |
192.168.1.103
10.0.0.3 |
yum install -y https://dl.fedoraproject.org/pub/epel/epel-release-latest-7.noarch.rpm
Add the Ceph repository to your yum configuration file at /etc/yum.repos.d/ceph.repo with the following command:
cat >/etc/yum.repos.d/ceph.repo

[ceph-noarch]

name=Ceph noarch packages

baseurl=https://download.ceph.com/rpm/el7/noarch

enabled=1

gpgcheck=1

type=rpm-md

gpgkey=https://download.ceph.com/keys/release.asc

yum -y update

yum -y upgrade
yum -y install gcc gcc-c++ autoconf libjpeg libjpeg-devel libpng libpng-devel freetype freetype-devel libxml2 libxml2-devel  zlib zlib-devel glibc glibc-devel
glib2 glib2-devel bzip2 bzip2-devel zip unzip ncurses ncurses-devel curl curl-devele2fsprogs  e2fsprogs-devel krb5-devel libidn libidn-devel openssl openssh openssl-devel
 nss_ldap openldap openldap-devel openldapclients openldap-servers libxslt-devellibevent-devel ntp libtool-ltdl bison libtool vim-enhanced python wget lsof iptraf
strace lrzsz  kernel-devel kernel-headers pam-devel Tcl/Tk cmake ncurses-devel bisonsetuptool popt-devel net-snmp screen perldevel pcre-devel net-snmp screen tcpdump rsync
sysstat man iptables sudo idconfig git system-config-network-tui bind-utils update arpscan tmux elinks numactl iftop bwm-ng net-tools
所有Ceph 集群节点采用CentOS 7.3 版本,所有文件系统采用Ceph官方推荐的xfs,所有节点的操作系统都装在RAID1 上,ssd硬盘做raid1两组,其他的硬盘单独用,不做任何RAID。
安装完CentOS 后我们需要在每个节点上(包括ceph-deploy )做以下配置:
centos 使用以下命令:
hostnamectl set-hostname 主机名
[root@ceph-node1 ~]# vim /etc/hosts

node1  192.168.1.101

node2   192.168.1.102

node3   192.168.1.103
[root@node1 ~]# ssh-keygen

Generating public/private rsa key pair.

Enter file in which to save the key (/root/.ssh/id_rsa):

Created directory '/root/.ssh'.

Enter passphrase (empty for no passphrase):

Enter same passphrase again:

Your identification has been saved in /root/.ssh/id_rsa.

Your public key has been saved in /root/.ssh/id_rsa.pub.

The key fingerprint is:

SHA256:w62DTPnM/FipBL7sadsaEguNRf88+n7AVJeeQ/wIwMw1y8f0 root@node1

The key's randomart image is:

ssh-copy-id node1

ssh-copy-id node2

ssh-copy-id node3
systemctl stop firewalld.service

systemctl disable firewalld.service
node1安装ntp 同步时间
yum -y install ntp ntpdate ntp-doc

systemctl enable ntpd.service

systemctl start ntpd.service
node2 node3 添加crontab ,执行自动时间同步;
* */8 * * * ntpdate 192.168.1.101 >/dev/null 2>&1
